Showing posts with label widget. Show all posts

blogger me comment form short policy massage kaise add karte hai janiye hindi me

hello frnds 
aap agr ek acche or pro blogger hai but no like me to apko pata hona chahiye ki apke blog ke liye apke readers ka comment kitna jaruri hai ye isliye jaruri hai ki apko readers se prerna milti hai,lekin apne dekha hoga ki kabhi kabhi kuch log bahut bekar bhasha me coment karte hai to iske liye apko apne blogspot blogger me ek comment policy banani chahiye ye isliye ki jab bhi koi apko comment kare to pahle comment policy  padh le uske baad me comment kare to chaliye ham apko batate hai ki kaise app bvlo0gger me comment policy add karte hai comment bbox ke uper 

to chaliye sikhte hai?

1.sabse pahle apko apne blogger dashboard me log in hona hai..
2.ab apko apne dashboard me dikh rahe SETTING ke icon pe click karna hai...
3.uske baad apko POST,COMMENT&sharing wale section pe click karna hai..
4.ab apko Comment Form Message ke samne ek add ka option milega apko uspe click karna hai. 
5.jab app add pe click karte hai to apke samne ek massage box open hota hai jisme apko koi bhi short policy add karni hai 
6.uske baad apko SAVE SETTING pe click karna hai 
7.ab apko apne massage ka preview dekhna hai ki kaisa lag raha hai maine jo add kiya hai o aap niche dekh sakte hai 


dosto ye post apki help jarur help karegi or apse ye asha hai ki aap isi tarah apna pyar banaye rakhenge dosto agr apko koi jankari chahiye to aap hame comment kare ya mail kare ham apki help karenge aap hamre forum me apna sawal jarur kare apko jawab jarur milega aap is forum me screen shot bhi bhej  sakte hai 


4 in 1 Social Subscribing Slide Out Widget blogger ke liye

H ello frnds 
aaj ham apko batate hai ki aap apne blog me SLIDE OUT social subscribe widget blog me kaise lagate hai.apne bahut sare blog me dekha hoga ki side me facebook twitter ke icon lage hote hai or jab aap apne pc ya computer ka arrow us icon pe le jate hai to apko uska poora hissa nazar aata hai jo apko ya hamko sabhi ko behad accha lagta hai isliye ham apko bahut hi simple tarike se is widget ko apne blogger blog me add karne ki trick ko apke sath share karenge to chaliye ham jante hai is trick ke baare me or ham jo widget apko dene ja rahe hai o apke bahut se tariko se kam aayega jaise ki apke blog me space kam hai to aap is widget ko side me bhi use kar sakte hai,chaliye jante hai isko blog me kaise add kare 


sabse pahle aap apne blogger account me log in kare
1.log in blogger.com
2.click on layout section{layout wale section me click kare}
3.ab apko ADD A GADGET pe click karna
4.ab apko HTML/JavaScript  click karna hai 

5.ab apko ek popup box dikhai dega usme apko niche diya gaya code pest karna hai 
6.apko save button pe click karna hai 
7.sabse last me SAVE ARRANGEMENT  button per click karna hai


aap apna code yeha se copy kare 

<style> img,a { border: 0; } #on { visibility: visible; } #off { visibility: hidden; } #facebook_div { width: 196px; height: 340px; overflow: hidden; } #twitter_div { width: 246px; height: 353px; overflow: hidden; } #google_plus_div { width: 152px; height: 97px; overflow: hidden; margin-left: 50px; margin-top: 10px; } #knfeedburner_div { width: 300px; height: 97px; overflow: hidden; margin-top: 5px; margin-left: -4px; } #kakinetwork_div { width: 300px; height: 97px; overflow: hidden; }/* right side style */#facebook_right { z-index: 10005; border: 2px solid #3c95d9; background-color: #fff; width: 196px; height: 353px; position: fixed; right: -200px; } #facebook_right img { position: absolute; top: -2px; left: -35px; } #facebook_right iframe { border: 0px solid #3c95d9; overflow: hidden; position: static; height: 360px; left: -2px; top: -3px; } #twitter_right { z-index: 10004; border: 2px solid #6CC5FF; background-color: #6CC5FF; width: 246px; height: 353px; position: fixed; right: -250px; } #twitter_right_img { position: absolute; top: -2px; left: -35px; border: 0; } #google_plus_right { z-index: 10003; background-color: #F2F2F2; border: 2px solid #006ec9; border-top: 2px solid #0056a0; border-bottom: 2px solid #0056a0; border-right: 2px solid #0056a0; border-left: hidden; width: 152px; height: 97px; position: fixed; right: -154px; } #google_plus_right_img { position: absolute; top: -2px; left: -33px; border: 0; } #feedburner_right { z-index: 10003; background-color: #fefefe; border: 2px solid #5b5b5b; border-top: 2px solid #5b5b5b; border-bottom: 2px solid #5b5b5b; border-right: 2px solid #5b5b5b; border-left: hidden; width: 300px; height: 97px; position: fixed; right: -303px; } #feedburner_right_img { position: absolute; top: -2px; left: -33px; border: 0; } #kakinetwork_right { z-index: 10003; border: 2px solid #303030; background-color: #fff; width: 300px; height: 97px; position: fixed; } #kakinetwork_right img { position: absolute; top: -2px; left: -101px; }/* left side style */#facebook_left { z-index: 10005; border: 2px solid #3c95d9; background-color: #fff; width: 196px; height: 353px; position: fixed; left: -200px; } #facebook_left img { position: absolute; top: -2px; right: -35px; } #facebook_left iframe { border: 0px solid #3c95d9; overflow: hidden; position: static; height: 360px; right: -2px; top: -3px; } #twitter_left { z-index: 10004; border: 2px solid #6CC5FF; background-color: #6CC5FF; width: 246px; height: 353px; position: fixed; left: -250px; } #twitter_left_img { position: absolute; top: -2px; right: -35px; border: 0; } #google_plus_left { z-index: 10003; background-color: #006ec9; border: 2px solid #006ec9; border-top: 2px solid #0056a0; border-bottom: 2px solid #0056a0; border-left: 2px solid #0056a0; border-right: hidden; width: 152px; height: 97px; position: fixed; left: -154px; } #google_plus_left_img { position: absolute; top: -2px; right: -33px; border: 0; } #feedburner_left { z-index: 10003; background-color: #fefefe; border: 2px solid #5b5b5b; border-top: 2px solid #5b5b5b; border-bottom: 2px solid #5b5b5b; border-left: 2px solid #5b5b5b; border-right: hidden; width: 300px; height: 97px; position: fixed; left: -303px; } #feedburner_left_img { position: absolute; top: -2px; right: -33px; border: 0; } #kakinetwork_left { z-index: 10003; border: 2px solid #303030; background-color: #fff; width: 300px; height: 97px; position: fixed; } #kakinetwork_left img { position: absolute; top: -2px; right: -101px; } .box-title1 { border: 1px solid #ddd; /*border-radius*/ -webkit-border-radius: 6px; -moz-border-radius: 6px; border-radius: 6px; /*box-shadow*/ -webkit-box-shadow: 5px 5px 5px #CCCCCC; -moz-box-shadow: 5px 5px 5px #CCCCCC; box-shadow: 5px 5px 5px #CCCCCC; padding: 10px; margin: 10px 0; } .enteryouremail { background: #fff !important; border: 1px solid #d2d2d2; padding: 0px 8px 0px 8px; color: #a19999; font-size: 12px; height: 25px; width: 165px; /*border-radius*/ -webkit-border-radius: 5px; -moz-border-radius: 5px; border-radius: 5px; margin: 0px; } .submitbutton { background: #F2F2F2; border: 1px solid #F66303; /*box-shadow*/ -webkit-box-shadow: 3px 3px 3px #666; box-shadow: 3px 3px 3px #666; font: bold 12px Arial, sans-serif; color: #000000; height: 25px; padding: 0 12px 0 12px; margin: 0 0 0 5px; /*border-radius*/ -webkit-border-radius: 5px; border-radius: 5px; cursor: pointer; } </style><script src='http://ajax.googleapis.com/ajax/libs/jquery/1.7.1/jquery.min.js'></script> <script type="text/javascript" src="http://apis.google.com/js/plusone.js"></script> <script type="text/javascript">jQuery(document).ready(function(){ jQuery("#facebook_right").hover(function(){ jQuery(this).stop(true,false).animate({right: 0}, 500); },function(){ jQuery("#facebook_right").stop(true,false).animate({right: -200}, 500); }); jQuery("#twitter_right").hover(function(){ jQuery(this).stop(true,false).animate({right: 0}, 500); },function(){ jQuery("#twitter_right").stop(true,false).animate({right: -250}, 500); }); jQuery("#google_plus_right").hover(function(){ jQuery(this).stop(true,false).animate({right: 0}, 500); },function(){ jQuery("#google_plus_right").stop(true,false).animate({right: -154}, 500); }); jQuery("#feedburner_right").hover(function(){ jQuery(this).stop(true,false).animate({right: 0}, 500); },function(){ jQuery("#feedburner_right").stop(true,false).animate({right: -303}, 500); }); });</script> <div id="on"> <div id="facebook_right" style="top: 18%;"> <div id="facebook_div"> <img src="https://blogger.googleusercontent.com/img/b/R29vZ2xl/AVvXsEhtxgA1MlWx7fKkX_szKpmskbTyZlSlXaUqJvRFjv5jUP83nbhLM6qriz2BhcatO1FHatZn-vVsWFFIIx_-666qK-zWznwmBR_buJI1xVWrtQy-IvRd8y_p7IDyJ1_iy7mcw-U9Td4G9yU/s1600/anytimehelp7.com-facebook-icon.png" alt=""/> <iframe src="//www.facebook.com/plugins/likebox.php?href=http%3A%2F%2Fwww.facebook.com%2Fgaurav&amp;width=200&amp;height=346&amp;colorscheme=light&amp;show_faces=true&amp;border_color&amp;stream=false&amp;header=false" scrolling="no" frameborder="0" style="border:none; overflow:hidden; width:200px; height:346px;" allowtransparency="true"> </iframe> </div> </div> </div> <div id="on"> <div id="twitter_right" style="top: 35%;"> <div id="twitter_div"> <img id="twitter_right_img" src="https://blogger.googleusercontent.com/img/b/R29vZ2xl/AVvXsEg9SPcuA6CKpjq29_Q7i0xvtDgz5po46TTCDnYauTM_f9ZvIug7IB9G0ak68a9qM8cDG_-PelTRXpGpekCEqazheTayIZx0EfZaZX9wLvWnUIxLfk1Rklyrm5tLJdeFG08jXbmGFuHomhg/s1600/helperblogger.com-twitter-icon.png"/> <script src="http://widgets.twimg.com/j/2/widget.js"></script> <script>new TWTR.Widget({version: 2,type: 'profile',rpp: 4,interval: 1000,width: 246,height: 265,theme: {shell: {background: '#63BEFD',color: '#FFFFFF'},tweets: {background: '#FFFFFF',color: '#000000',links: '#47a61e'}},features: { loop: false,live: true,scrollbar: false,hashtags: false,timestamp: true,avatars: true,behavior: 'all' }}).render().setUser('anytimehlp7').start();</script> </div> </div> </div> <div id="on"> <div id="google_plus_right" style="top: 52%;"> <div id="google_plus_div"> <img id="google_plus_right_img" src="https://blogger.googleusercontent.com/img/b/R29vZ2xl/AVvXsEhmS-h4DzA5GMdSemu1k9ZuCDmoxTubNc18WaCYM3WyPupE3ScosEw0Ri4Ec-L9MpW4lnuIeHrDUBDRoXA58ZV5iHvXAqgjN6zIpjUBstoM0OWS1rhuUkVfDtPqjjzu7hPln-MZ7oZf6-E/s1600/helperblogger.com-google-plus-icon.png"/> <div style="float:left;margin:10px 10px 10px 0;"> <g:plusone size="tall" expr:href="data:post.url"></g:plusone> </div> </div> </div> <div id="on"> <div id="feedburner_right" style=" top: 69%;"> <div id="knfeedburner_div"> <center> <h4 style="color:#F66303;">You can also receive Free Email Updates:</h4> <form action="http://feedburner.google.com/fb/a/mailverify" method="post" target="popupwindow" onsubmit="window.open('http://feedburner.google.com/fb/a/mailverify?uri=anytimehelp7', 'popupwindow', 'scrollbars=yes,width=550,height=520');return true"> <input gtbfieldid="10" class="enteryouremail" name="email" value="Enter your email here..." onblur="if (this.value == &#39;&#39;) {this.value = &#39;Enter your email here...&#39;;}" onfocus="if (this.value == &#39;Enter your email here...&#39;) {this.value = &#39;&#39;;}" type="text"/><input value="anytimehelp7" name="uri" type="hidden"/><input value="Submit" class="submitbutton" type="submit"/> </form> </center><img id="feedburner_right_img" src="https://blogger.googleusercontent.com/img/b/R29vZ2xl/AVvXsEg7mu29h_PC4Xdns7vLydEvRdVjuyXW4SVgjvsUL15_4vrLhRfnQOjorK61Y7nC3YbxqSnls3QBLxLLUH4NFllNhOYHeSpGZ17XlTYJncN1zVm3JJZPyFqL5alRKcdhyphenhyphenC-lNqGg5OZzs-U/s1600/helperblogger.com-subscribe-icon.png"/> </div> </div> </div> </div>


customization:


  1.  1.aap jo red colour me pe apko facebook fan page name dalna hai 
  2. 2.aap janha pe bhi mera naam ya WWW.ANYTIMEHELP7.COM dekh rahe hai usko apne url se replace kar de 
  3. 3.aap jo blue colour me dekh rahe hai usko aap apne feedburner ke user name me replace kar de

  4. frnds ye rahi aaj ki post agar apko is post ke baare me kuch puchna hai to plzzz comment kare mai apki help jarur karunga 

    > request for you/agr apki thodi bhi help hui hai to

    plzzz share this post with your frnds
     thannkxxx for read this


  5.  

feedburner live status widget apne blog me kaise add kare janiye hindi me

hello frnds 
aj ham baat karte hai ki aap apne blog me FEED BURNER LIVE STATUS widget kaise use karte hai or isko use karne se hamko kya fayda hota hai kya hamare blog me bhi ye widget lag sakta hai or agr lag jata hai to isko kaise lagate hai chaliye jante hai apke in sabhi sawalo ke jawab denge 


chaliye sikhte hai ki apko apne blog pe live readers status widget kaise add karna hai?


agr apko apne blog me ye simple widget add karna hai to apko ye sabhi steps bahut hi carefully follow karne honge 


screen shot 


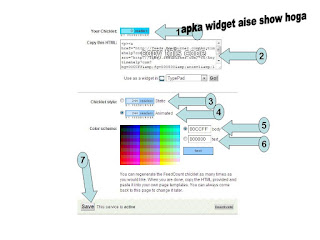
  • jab aap apna blog select karenge to aap apne blog ke feed burner dashbord me pahuch jate hai 
  • dash me jaker apko PUBLICIZE pe click karna hai 
  • uske baad apko ek feed count ka option milega ab apko uspe click karna hai 
  • ab apke samne ye option aata hai ki apko apne blog me kaisa widget lagana hai 
  • agr apko animeted live status widget lagana hai to second number wale pe click kare 
  • or agr apko sthir widget lagana hai to aap first wale pe click kare 
  • uske baad apko ACTIVATE button pe click karna hai 


  • jab aap activate button pe click karte hai to apko ek code milta hai 
  • aap us code ko copy kare or save button pe click kare
  • apne blog ke dash board me jaye 
  • waha pe LAYOUT pe click kare 
  • fir ye decied kare ki apko ye code kaha pe lagana hai ya apko apne blog me live blog readers count widget  kaha pe add karna hai ye nishit karke ADD A GADGET pe click karna hai 
  • or code ko pest karna hai fir apko apne template ko save karna hai

congress ab apka live status widget apke blog pe lag chuka hai ap isko check kare ki ye work kar raha hai ki nhi 


to my dear frnds apko ye post kaisi lagi aap hame jarur bataye agr apko kuch puchna hai ya apne blog ke baare me kuch janana hai ya fir apka koi aisa question hai jiska ans apko nhi mil raha hai to aap  hame jarur bataye ham apki jarur help karenge 


thankxxx for read this

code box kaise add post ke bich me karte hai janiye hindi me

hello frnds 
kya aap blogging me apna ek bahut acha future talash rahe hai to ye to pakka hai ki apke blog ko bhi iske liye ready rahna hoga apko apne blog me ache ache post dene honge hamesha apne blog ke readers ka dhyan rakhna hoga or agr apko apne blog ko bahut famous banana hai to apko apne blog ke post qulity ke sath sath uske designe pe bhi dhyan dena hita hai to aaj ham apko batate hai ki POST KE BICH ME CODE BOX KAISE ADD KARTE HAI OR  YE Q JARURI HAI

sabse pahle jante hai ki code box blog ke liye kyo jaruri hai?
to chaliye ham apko batate hai ki apko ye code box apne blog me q add karna chahiye
  1. apke blog me ye space<jagah >kam leta hai 
  2. apka post behad acha lagne lagta hai apke post proffeshional look me aa jate hai 
  3. apke blog ko log kahi jyada like karte hai 
  4. apke post ki lenth short ho jati hai 
or bhi bahut kuch change ho jata hai apke post me or apka post ek behad acha lagne lagta hai 

ye bhi padhe:

chaliye jante hi ki isko apne blog me ya post me add kaise karte hai?

aap agar is code box ka maza apne blog me lena chahte hai to apko ye steps follow karne honge
  1. sabse pahle apko apne blogger.com me log in karke apne blog ke dashboard me jana hoga
  2. uske baad apko TEMPLATE pe click karna hoga
  3. ab apko EDIT HTML PE click karna hoga fir apko CTRL+F press karna hai
  4. ab apko ek search box show hoga usme apko  ]]></b:skin> code search karna hai
  5. jab apko ye code mil jaye to apko niche diya gaya apko]]></b:skin> ke uper pest karna hai 
  6. ab apko apne template save kar dena hai 
ye bhi padhe:)


ye hai apka screen shot


ye hai apka code


/* Code Box ----------------------------------------------- */ .code { background:#f5f8fa; background-repeat:no-repeat; border: solid #5C7B90; border-width: 1px 1px 1px 20px; color: #000000; font: 13px 'Courier New', Courier, monospace; line-height: 16px; margin: 10px 0 10px 10px; max-height: 200px; min-height: 16px; overflow: auto; padding: 10px 10px 10px; width: 90%; } .code:hover { background: #FAFAFA; background-repeat:no-repeat; }

isko post ke bich me use kaise karte hai jante hai iske baare me

ye to apko pata ho chuka hai ki code box ko apne template me kaise add karte hai or isase kya fayada hota hai ab apko batata hu ki isko post ke bich me kaise lagate hai

  1. sabse pahle aap o jagah<place>nishit kar le ki apko apne post  kis jagah lagana hai 
  2. uske baad ap janha bhi lagana chahte hai waha pe HTML section me jakar ye niche diya gaya code pest karde 
  3. jab aap code pest karte hai to apko usko kuch change karne ki jarurat hoti hai 
  4. aap dekh rahe honge ki niche jaha pe ye likha hai APNA CODE YEHA PE DALE waha pe apna code replace kar de 
  5. fir aap COMPOSE section me jaye or apne post ka preview dekhe 
apka dusra code ye hai
<div class="code">
YOUR CODE 
</div>

ab aap apne post ke bich me code box add karna sikh gaye hai agr apko is post ko lekar koi confusion hai to plzzz aap hame comment kare hamare forum me apna sawal puche ham apki poori help karenge 


thankxxx for  read this


face book like box/facebook fan box blog me kaise lagate hai janiye hindi me

hello frnds
aaj ham is post me baat karenge ki apne blog me facebook like box kaise lagate hai aapne bahut se site me dekha hoga ki ye box add hota hai or apke pass bhi blog hai or bhi is box ko apne site me kaise lagate hai janiye aap is post me ham aapko batate hai batate hai ki ki is widget ko apne blog me kaise add karte hai 


jante hai facebook like box blog me kaise lagate hai?

sabse pahle hamko is link per jana hai jab ham yeha per jayenge to hame to hamare samne jo page hoga usme PAGE PULGIN per click karna hai 


uske baad apko wait karna hai ki page sahi se load hojaye load hone ke baad apse jaha per FACEBOOK PAGE URL hai us box me apne page ka url dale  
apko tab tak wait karna hai jab tak apke page ka photo niche box me na aye 
jab apka page photo aa jaye tab  apko GET CODE per click karna hai 


jab aap GET CODE button pe  click karte hai to apko ek code milega jo popup box me hoga apko us code ko copy karna hao or apne blog ke layout me jana hai jante hai ki blog me facebook like box ka html code kaise lagate hai 
jante hai ise blog me kaise lagaye?

pahle aap apne blog ke dashboard me jaye or aap layout per click kare


ab apko select kare ki aap is widget ko kaha per lagana chahte hai 
jab aap select kar le to apko add a gadget per click karna hai 
jab aap yeha click karenge to apke screen per ek popup window open hoga usme apko HTML per click karna hai


ab apke samne ye box open hoga iske uper ek BOX or hota hai aap waha jo chahe dal de or apko CODE niche wale box me paste karni hai 


ab apko save button per click karna hai aap chahe to PREVIEW bhi dekh sakte hai 
uske baad apko SAVE AGRIMENT per click karna hai to lijiye apke blog pe ab facebook fan box add ho chuka hai apne dosto ko invite kare  or apne like badhaye 

frnds agr apko ye post pasand aai ho to apne dosto ke sath jarur share kare 

thankxxx for read this


apne blog ya site ke liye Discussion forum kaise banate hai janiye yeha pe

hello frnds 
aaj ham baat karenge ki apne blog me forum kaise add karte hai free me iske baare me apko mai bahut hi simple trick bataunga jo ki apko bahut hi simple tarike se apka ek bahut hi best forum bana denge,ham yeha pe forum banane ke liye google ka use karnge jiske help se ham ek badhiya forum banayenge to chaliye jante hai ki kaise banate hai blog ya site ke liye forum


blog ya site me forum kyo add karna chahiye?
hamko apne blog me forum kyo add karna chahiye  jante hai
  • apke blog pe visitors aate hai to kuch janana chahte hai isliye ye unke liye bahut hi better option hai 
  • ek sath bahut se logo ki help ho jati hai 
  • ham ek hi jagah pe bahut se topic pe discuss kar sakte hai
  • apke blog me ek profeshional look bhi aa jata hai 
  • log apke blog ko kafi mahtav dene lagenge
blog ya site ke liye forum kaise banate hai?
frnds abhi kuch time pahle mai kuch blog check kar raha tha jo kuch popular bhi hai unpe traffic bhi aa raha hai to maine us blog ka forum ko open karna chaha lekin us blog me discussion forum hi nhi tha to main socha ki bhai itna popular blog pe forum q nhi hai tabhi maine decied kiya ki mujhe iske baare me likhna chahiye to chaliye jante hai ki apne blog me discussion forum kaise add karte hai uske liye apko ye step follow karne hone

jab aap CREATE GROUP pe click karenge to apko ek new forum milega usme apko sabhi details bahut hi care fully fill karni hai
  1. GROUP NAME:isme apne forum ka name dalna hai ki aap apne forum ka name kya rakhna chahte hai
  2. GROUP EMAIL ADDRESS:apko yeha pe apne FORUM ka name dena hai 
  3. GROUP DESCRIPTION:yeha pe apko apne forum ke baare me likhna hai ki apka forum kis topic pe hai
  4. Group's primary language : yeha pe apko apne forum ke liye koi language select karni hai
  5. GROUP TYPE:isme apko Q&A select karna hai kyoki hame iski hi jarurat hai
  6. BESIC PERMISSION:isme apko PUBLIC select karna hai <apko 6,7,8 option pe public hi select karna hai>

screen shot dekhe


forum ko blog me kaise set karte hai?
hamne apne blog ke liye forum to bana liya hai lekin isko blog pe set kaise karte hai to follow kare ye steps
  • sabse pahle apko apne blog ke dashbord me jana hai or PAGES pe click karna hai 
  • uske baad apko NEW PAGE pe click karna hai

screen shot dekhe
apko ab kya karna hai jante hai 
  1. sabse pahle apne forum ka naam dale TITTLE box me
  2. ab apko HTML section pe click karna hai 
  3. niche diya gaya code pest karna hai
  4. ab apko last me apne page ko PUBLISH kae dena hai 

ye hai apka code

<iframe frameborder="0" height="1000px" id="forum_embed" scrolling="no"

src="javascript:void(0)" width="100%">
    <br />
</iframe>
<script type="text/javascript">
    document.getElementById("forum_embed").src =
        "https://groups.google.com/forum/embed/?place=forum/anytimehelpforum" +
        "&showsearch=true&showpopout=false&parenturl=" + encodeURIComponent(window.location.href);
</script>

aap jo red me dekh rahe hai waha pe apko apne forum ki id dalni hai ye id apko Group email address me mil jayegi ye id aisi hoti hai https://groups.google.com/d/forum/anytimehelpgooglegroups.com  isme se apko anytimehelp@googlegroups.com leni hai or red me dikh rahe code se replace kar dena hai


congratulations>>apke blog me forum add ho gaya hai 

agar apko mere is post se juda koi dought hai to plzzz comment kare ham apki help karenge,apse ek request hai agar apko meri ye post pasand aayi hai to share jarur kare

thankxxx for read this

simple trick blog ke liye contact us page kaise banate hai blogger ya blogspot blog ke liye

hello frnds
aaj ham baat karenge ki apne blog me contact page kaise banate hai or iski kya jarurat hoti hai or hamre liye ye kitna help full hota hai or bhi bahut se jankari hai jinko apko jarur janana chahiye ham apko in sabhi sawalo ke jawab apko denge to chaliye start karte hai,


blog me contact us page kyo banate hai?
apke is question ke sabhi answer yeha pe dene ki koshis ki gayi hai 
  1. sabse badi baat jab hamre blog pe contact us,privecy&policy about us jaise kuch page nahi honge tab tak apka google account prove nhi hoga 
  2. google adsence bahut hi jaldi approve ho jata hai 
  3. apke readers apko direct personal mail kar dete hai 
  4. isase apke visitors ap pe vishwas karte hai 
  5. apke blog ko ek profeshional look bhi mil jata hai jo bahut hi jaruri hota hai
  6. ham contact forum ko sidebar me nhi use kar sakte hai hamara blog bhadda ho jata hai 
or bhi bahut se karan hai jo apko apne blog me contact us page banane ke liye kahte hai 
ab jante hai ki apne blog me contact us page kaise lagate hhai janiye 

blog me contact us page kaise banate hai?
 hamne ye to samjh hi liya h ab ham apko batate hai ki apne blog me contact us page kaise add karte hai 
  1. sabse pahle apko apne blog ke dash bord me jana hai waha pe apko PAGES pe click karna hai 
  2. ab apko new page ka option dikhai dega apko uspe click karna hai 
                                                       screen shot dekhe 


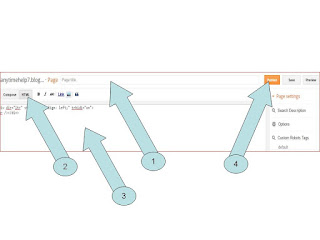
jab apke samne page editor open ho jaye to apko ye step follow karne hai 


  1. sabse pahle apko tittle box me CONTACT US likhna hai yeha pe aap apne man pasand tittle de sakte hai jaise CONTACT US,CONTACT ME etc 
  2. ab apko HTML wale section me jana hai or waha pe apko niche diya gaya code pest karna hai 
  3. ab apko right side me OPTION dikh raha hoga uspe click karke READER COMMENT don't allow kar de
  4. ab apko apne page ko preview karna hao or dekhna hai ki sab kuch sahi hai ya nhi
  5. agr sab sahi hai to direct apne page ko publish kar de
 

code for you

<script>
var blogId = '2065520097349933214';//this number should be mandatorily edited.
//The below message 5 Strings can also be edited
var contactFormMessageSendingMsg ='Sending...';
var contactFormMessageSentMsg = 'Your message has been sent.';
var contactFormMessageNotSentMsg = 'Message could not be sent. Please try again later.';
var contactFormEmptyMessageMsg ='Message field cannot be empty.';
var contactFormInvalidEmailMsg = 'A valid email is required.'

var widgetLoaded=false;
function sendEmailMsg() {
if(widgetLoaded== false) {
_WidgetManager._RegisterWidget('_ContactFormView', new _WidgetInfo('ContactForm1', 'sidebar', null, document.getElementById('ContactForm1'), {'contactFormMessageSendingMsg': contactFormMessageSendingMsg , 'contactFormMessageSentMsg': contactFormMessageSentMsg , 'contactFormMessageNotSentMsg': contactFormMessageNotSentMsg , 'contactFormInvalidEmailMsg': contactFormInvalidEmailMsg , 'contactFormEmptyMessageMsg': contactFormEmptyMessageMsg , 'title': 'Contact Form', 'blogId': blogId, 'contactFormNameMsg': 'Name', 'contactFormEmailMsg': 'Email', 'contactFormMessageMsg': 'Message', 'contactFormSendMsg': 'Send', 'submitUrl': 'https://www.blogger.com/contact-form.do'}, 'displayModeFull'));
widgetLoaded=true;
document.getElementById('ContactForm1_contact-form-submit').click();
}
return true;
}
</script>
<form name='contact-form'>
<div>Your Name : </div>
<input class='contact-form-name' id='ContactForm1_contact-form-name' name='name' size='30' type='text' value=''/>
<div>Your Email: <em>(required)</em></div>
<input class='contact-form-email' id='ContactForm1_contact-form-email' name='email' size='30' type='text' value=''/>
<div>Your Message: <em>(required)</em></div>
<textarea class='contact-form-email-message' id='ContactForm1_contact-form-email-message' name='email-message' rows='5'></textarea>
<p></p>
<input class='contact-form-button contact-form-button-submit' id='ContactForm1_contact-form-submit' type='button' value='Send' onclick="sendEmailMsg()"/>
<div style='text-align: center; max-width: 450px; width: 100%'>
<p class='contact-form-error-message' id='ContactForm1_contact-form-error-message'></p>
<p class='contact-form-success-message' id='ContactForm1_contact-form-success-message'></p>
</div>
</form>
take care>>aap jo digit red colour me dekh rahe hai o mere blog ki id hai apko bhi ye id add karni hai mere id ko delete karke 

mere blog ki id kaha hai ?
apka blog id apko apke brower me milega SCEEN SHOT DEKHE


in short>>go to blogger dashbord>>click on page section>>now click on new page>>fill tittle in ittle box>>then click HTML section>>pest the code hare>>go OPTION section and click don't allow reader comment>>click on preview>>now this is last step click on publish button 

NOTE=jab aap apne blog me contact us page add kar le to isko pahle aap khud apne aap sms karke try kar le 

frnds aap hamse apne sawal comment karke ya forum me post karke ya fir aap direct live chat widget ka use kar sakte hai ham apki sabhi tariko se help karenge,agar apko ye post pasand aayi hai to share jarur kare

thankxx for read this

Ads Inside Post